Complete example
In this tutorial we will create a simple html form, serve it locally with a simple web-server, then protect using Private Captcha and, finally, verify form submission. And all this in the comfort of your own computer (meaning, you don’t have to have a running server in the cloud).
Note
For transparency, in this tutorial everything is implemented from scratch, but in production one would typically use our existing integrations.
Basic webpage and server
-
- index.html
- main.go
Create a simple page with a form element in the middle of the page.
<!DOCTYPE html>
<html lang="en">
<head>
    <title>Private Captcha Example</title>
    <style>
        body {
            display:flex;
            flex-direction: column;
            min-height: 100vh;
        }

        form {
            max-width: 32rem;
            margin: auto;
            display: flex;
            flex-direction: column;
            gap: 20px;
            border: 1px #ccc solid;
            padding: 20px;
        }
    </style>
</head>
<body>
    <div style="display: flex; flex: 1 1 0%">
        <form action='/submit' method="POST">
            <label> Email: </label>
            <input type="email" name="email" placeholder="Email address" required />
            <button id="formSubmit" type="submit" disabled> Submit </button>
        </form>
    </div>
</body>
</html>
And a web-server that will serve it (Go is used here as an example).
package main

import (
	"log"
	"net/http"
)

func main() {
	http.HandleFunc("/", func(w http.ResponseWriter, r *http.Request) {
		if r.URL.Path == "/" {
			http.ServeFile(w, r, "index.html")
			return
		}
		// Return 404 for any other paths
		http.NotFound(w, r)
	})

	if err := http.ListenAndServe(":8081", nil); err != nil {
		log.Fatal(err)
	}
}
You can run it using go run main.go and open http://localhost:8081/ in the browser.
Here’s how it looks like in Firefox:

(optional) Making this server available publicly
We can use ngrok for this purpose, but you can use any compatible solution, such as CloudFlare Tunnel or even reverse SSH tunnel from your own server.
# run ngrok to our previously exposed port 8081
ngrok http 8081
This will give you a public domain, in this case, https://27ca-193-138-7-216.ngrok-free.app. You can verify that it’s working by opening it from your terminal.
You can use this domain as a property domain below.
Add captcha widget to the form
This assumes that you already have an account with Private Captcha. If you don’t, go ahead and create one.
Create new property
In the dashboard, click “Add new property”:

For a domain, enter any valid domain (if you used ngrok in the previous step, add the generated domain):

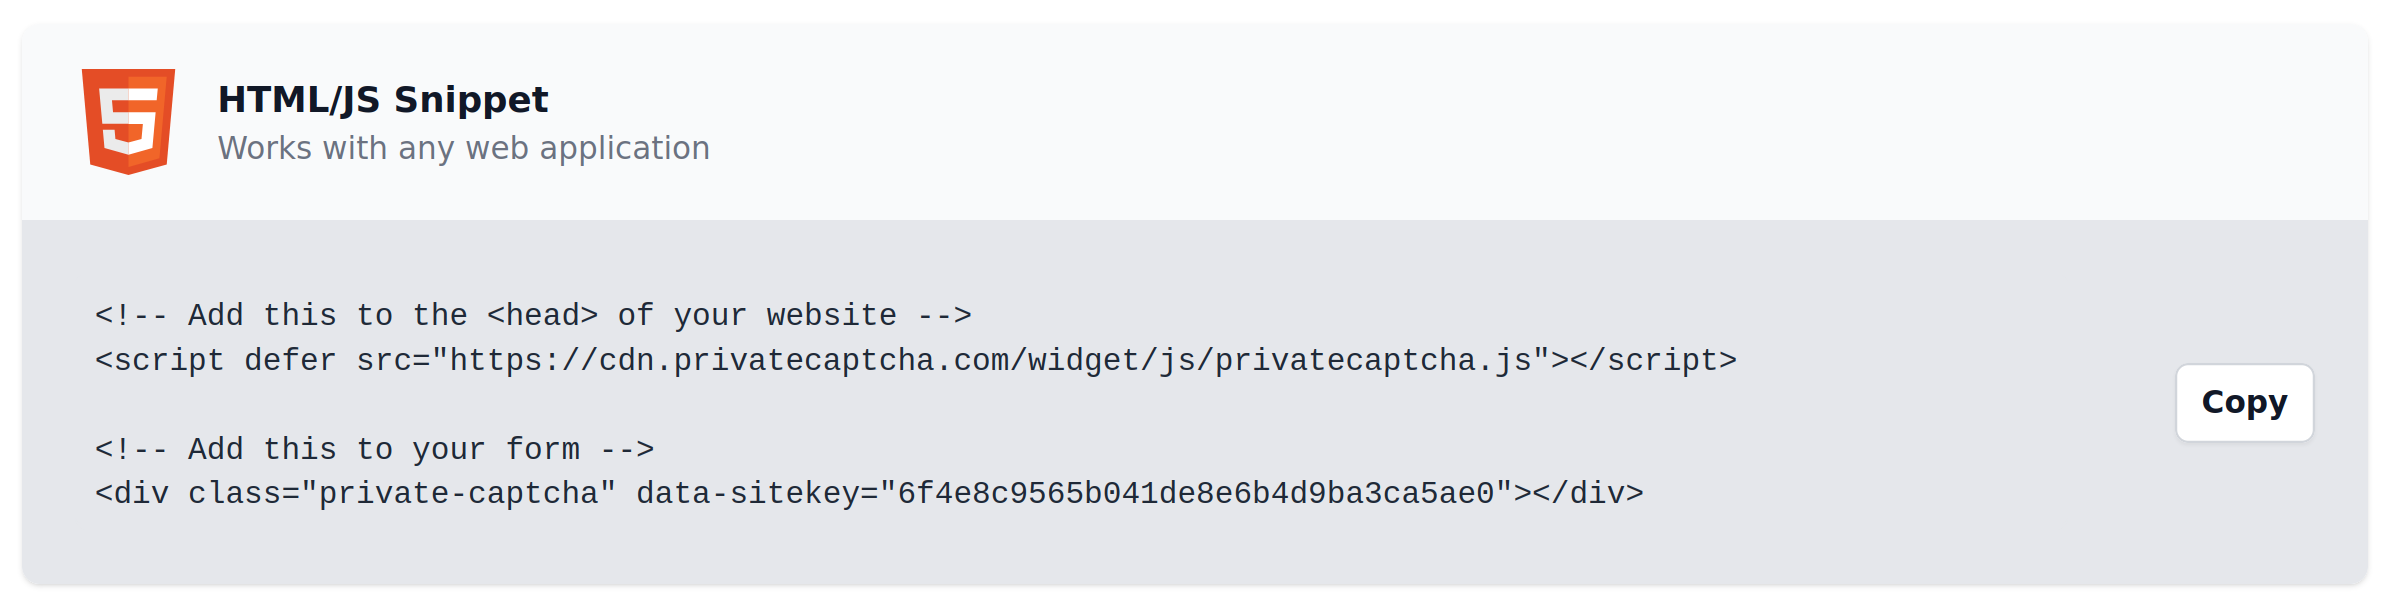
After property is created, we will be presented with the integration snippet:
Add captcha widget to the form
To integrate the widget, we need to add javascript include for privatecaptcha.js and the widget itself to the form. You can get them from the integration snippet above.
Note
Make sure to use your own sitekey
     </style>
+    <script defer src="https://cdn.privatecaptcha.com/widget/js/privatecaptcha.js"></script>
 </head>
 <body>
     <div style="display: flex; flex: 1 1 0%">
         <form action='/submit' method="POST">
             <label> Email: </label>
             <input type="email" name="email" placeholder="Email address" required />
+            <div class="private-captcha" data-sitekey="xyz"></div>
             <button id="formSubmit" type="submit" disabled> Submit </button>
         </form>
     </div>
If you did everything correctly, when you refresh the page (and/or restart your server), you will see the captcha widget inside your form:

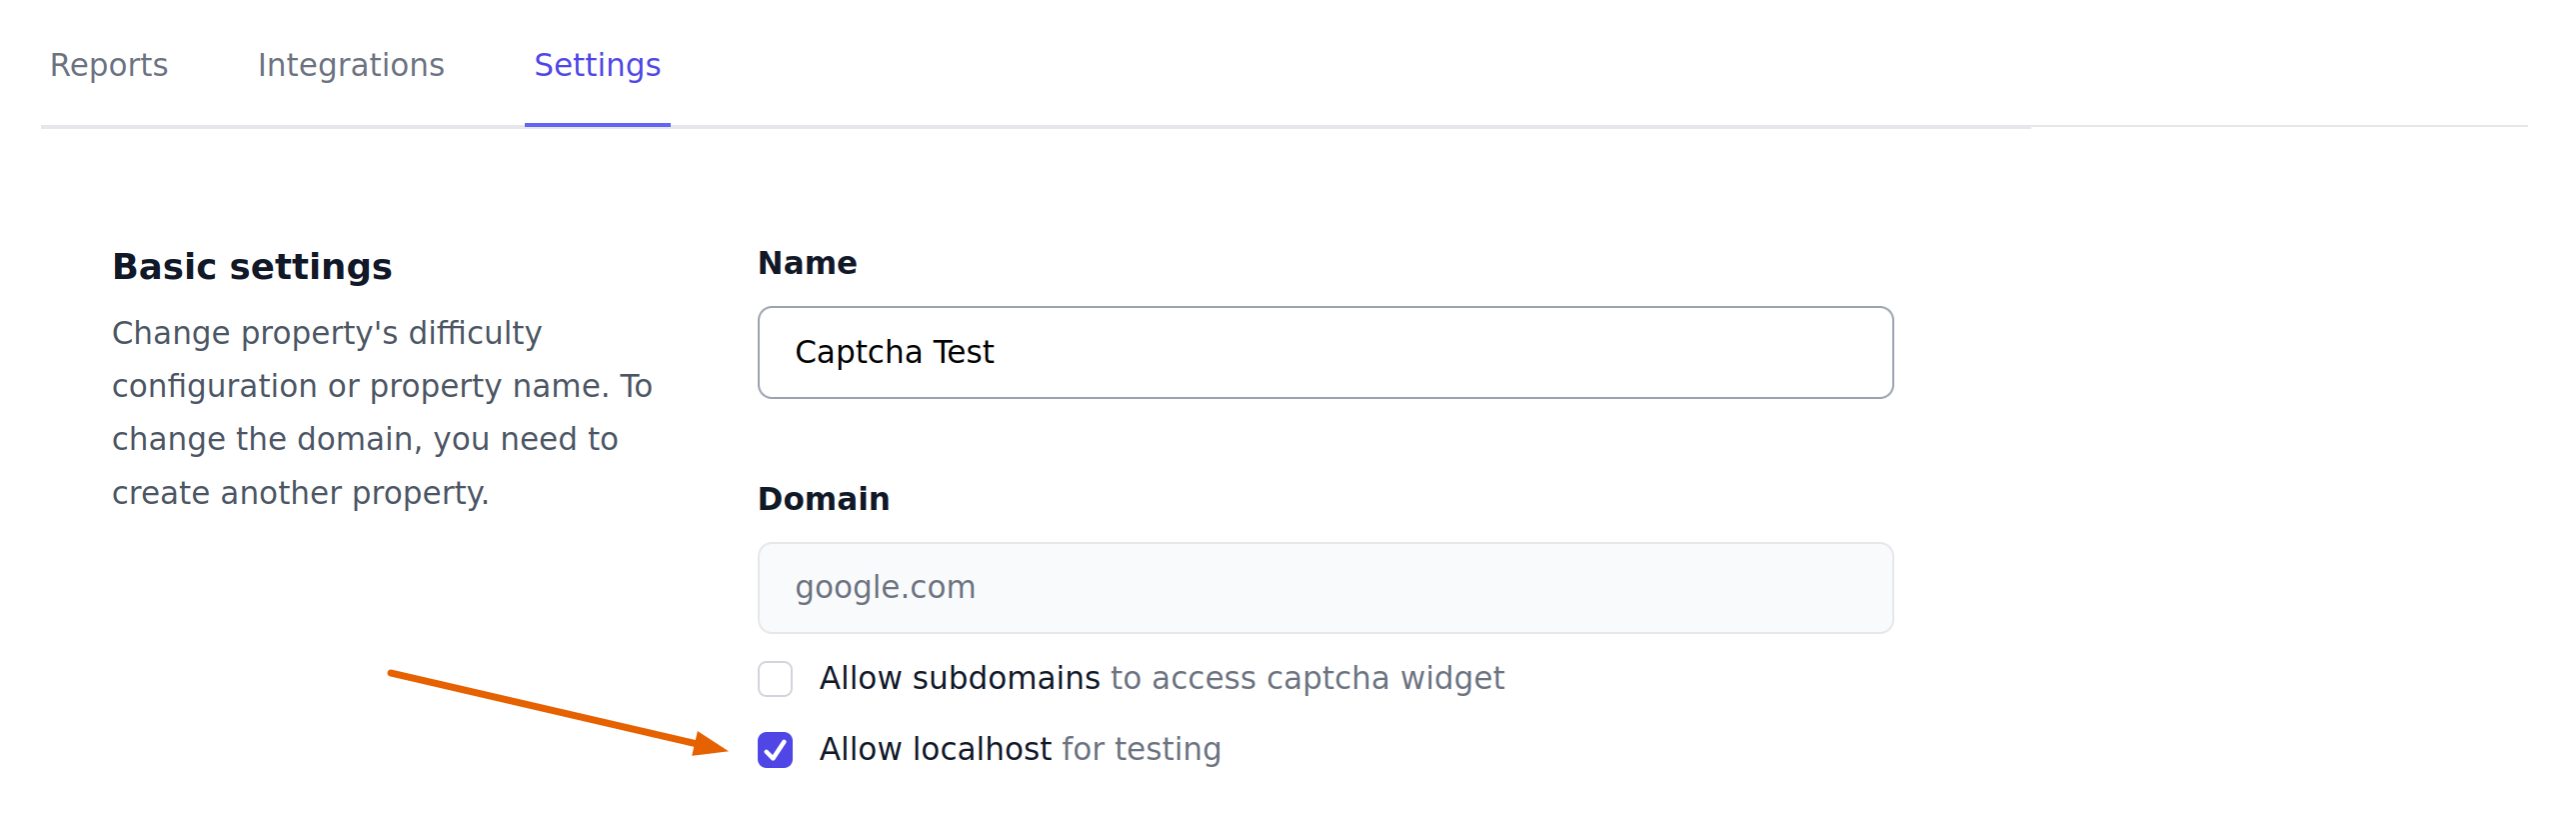
Warning
Captcha has a strict CORS policy and, by default, it will load only on the domain configured during property creation. Subdomains and localhost access needs to be explicitly allowed.
In order to make captcha widget to load on localhost domain, we need to allow it in the settings of the property you just created (this is not required if you used ngrok domain).
However, currently captcha widget is not yet particularly useful as we do not take it into account when submitting the form.
Integrating with Private Captcha
Client-side
In our simple web-page, let’s add a JavaScript function to enable the “Submit” button when captcha is solved.
@@ -18,7 +18,13 @@
             padding: 20px;
         }
     <script defer src="https://cdn.privatecaptcha.com/widget/js/privatecaptcha.js"></script>
+    <script type="text/javascript">
+        function onCaptchaSolved() {
+            const submitButton = document.querySelector('#formSubmit');
+            submitButton.disabled = false;
+        }
+    </script>
 </head>
 <body>
and connect this function to the widget itself by adding data-finished-callback attribute:
@@ -32,7 +32,7 @@
         <form action='/submit' method="POST">
             <label> Email: </label>
             <input type="email" name="email" placeholder="Email address" required />
-            <div class="private-captcha" data-sitekey="xyz"></div>
+            <div class="private-captcha" data-sitekey="xyz"
+                data-finished-callback="onCaptchaSolved"></div>
             <button id="formSubmit" type="submit" disabled> Submit </button>
         </form>
     </div>
Now client-side should be ready. What is left is only to verify captcha on the server-side.
Server-side
For server-side, we need to add a handler for the form and verify captcha solution.
To verify captcha solutions, we need an API key. Head to the portal, open your user’s Settings, then API keys and click “Create new key”.
Add code to verify solution
After captcha widget has finished solving the puzzle, it adds a hidden form field with solution (defined by data-solution-field attribute).
<form>
    <!-- ... -->
    <input name="private-captcha-solution" type="hidden" value="AAAAAAACAhQEAOiDAAAAAAC...IsoSTgYAAA=">
    <!-- ... -->
</form>
To verify solution we need to send a POST request with the contents of this field to /verify endpoint and check the result. This is done in the server-side handler of the form.
Warning
Below we are using API directly only for demonstration purposes. Most likely you want to use of of the integration SDKs that are available for popular languages.
Note
Make sure to use your own API key
@@ -1,11 +1,60 @@
 )

+func checkSolution(solution, apiKey string) error {
+       req, err := http.NewRequest("POST", "https://api.privatecaptcha.com/verify", strings.NewReader(solution))
+       if err != nil {
+               return err
+       }
+
+       req.Header.Set("X-Api-Key", apiKey)
+
+       resp, err := http.DefaultClient.Do(req)
+       if err != nil {
+               return err
+       }
+       defer resp.Body.Close()
+
+       response := struct {
+               Success bool `json:"success"`
+               Code    int  `json:"code"`
+               // NOTE: other fields omitted for brevity
+       }{}
+
+       if err := json.NewDecoder(resp.Body).Decode(&response); err != nil {
+           return err
+       }
+
+       if !(response.Success && response.Code == 0) {
+               return errors.New("solution is not correct")
+       }
+
+       return nil
+}
+
 func main() {
+       http.HandleFunc("POST /submit", func(w http.ResponseWriter, r *http.Request) {
+               const page = `<!DOCTYPE html><html><body style="background-color: %s;"></body></html>`
+               captchaSolution := r.FormValue("private-captcha-solution")
+               if err := checkSolution(captchaSolution, "your-api-key"); err != nil {
+                       fmt.Fprintf(w, page, "red")
+                       return
+               }
+               fmt.Fprintf(w, page, "green")
+       })
+
        http.HandleFunc("/", func(w http.ResponseWriter, r *http.Request) {
                if r.URL.Path == "/" {
                        http.ServeFile(w, r, "index.html")
Finale
Test your form
Now you can finally click “Submit” on your page and see if you get a “green result” in the end.

Now, if you did everything correct, your property dashboard in portal will also show some activity.

And, if you print verify response to the console, you will get this json:
{"success":true,"code":0,"timestamp":"2025-01-14T11:19:34Z","origin":"27ca-193-138-7-216.ngrok-free.app"}Full code
Congratulations on completing this tutorial! You can find full code in this gist.
Troubleshooting
To access browser logs you can add data-debug="true" attribute to the widget and then see if there are any errors in the console.
Captcha verification fails (you see a red page)
- localhost was not allowed in the property settings
- for deployments, different from
privatecaptcha.com, you also need to setdata-puzzle-endpoint="https://api.your-domain.com/puzzle"attribute